NXLog Configuration (Linux)
Install the NXLog Community Edition from the official website following the deployment guide.
Once installed, the steps to integrate NXLog with Panther are:
Download Linux Configuration Archive
The configuration archives are available on the Admin page. Select this using the tab from the main menu at the top of the Panther page.

The drop-down selector offers archives for the supported software and operating systems.
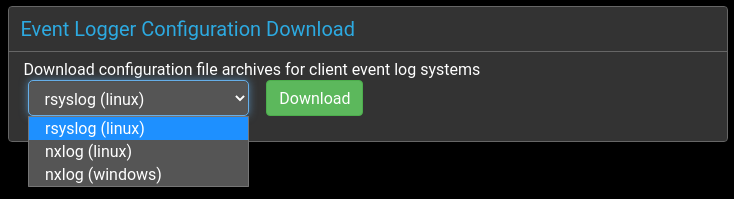
Select the appropriate option for your client and click the Download button.
The archives are downloaded in an appropriate format for each system:
- Linux archives are provided in uncompressed
tarformat, while - Windows archives are built using
zip.
NOTE: that the same certificates and keys are provided in each archive, so for custom configurations the choice of download is unimportant.
Install configuration files on Linux
To begin with, download the configuration archive as described above. The downloaded resources in nxlog-config-linux.tar then need to be installed into the system NXLog configuration directory.
The following commands will extract the archive into /etc/nxlog, which should have been created during the NXLog installation. Note that any existing nxlog.conf will be overwritten, so make a backup if one already exists.
[root@localhost ~]# cd /etc/nxlog
[root@localhost /etc/nxlog]# tar -xvf /path/to/nxlog-config-linux.tar
Apart from overwriting the main nxlog.conf, this will extract the required certificates and key files into a new panther sub-directory.
Restart NXLog on Linux
If NXLog has been installed according to the deployment guide, then it should restart automatically following a system reboot.
In order to have the new configuration take immediate effect, it is also possible to restart NXLog immediately. While systemd systems such as Ubuntu and CentOS are supported, at the time of writing the service management interface for NXLog is implemented as a wrapper around the System V init scripts.
This means that, on both systemd and init based systems, it is possible to restart NXLog by calling the init script directly:
[root@localhost /etc/nxlog]# /etc/init.d/nxlog restart
NXLog Configuration (Windows)
Download the Windows installer for the NXLog Community Edition from the official website.
Install the package by running the installer, but also see the deployment guide.
Once installed, the steps to integrate NXLog with Panther are:
Download Windows Configuration Archive
TODO
Install configuration files on Windows
Once the Windows configuration archive has been downloaded as described above, the contents of nxlog-config-windows.zip must be overlaid onto the base directory of the installed NXLog package. If the default install options were used, this will normally be:
C:\Program Files (x86)\nxlog.
Opening this directory with the Windows File Explorer will show that it contains cert and conf sub-directories, among others. While the cert directory should be empty, the conf directory may contain a sample nxlog.conf, which should be renamed nxlog.dist in order to prevent any clash with the new configuration.
Extract the downloaded nxlog-config-windows.zip Panther configuration archive by clicking on it and selecting the extract to option, specifying the base directory NXLog was installed into – normally C:\Program Files\nxlog – containing the cert and conf sub-directories.
This will copy the certificates and key files into the empty cert directory, along with a new nxlog.conf into the conf directory. Note that the system may ask for confirmation when writing to the cert directory, owing to its permissions.
Restart NXLog on Windows
The NXLog installer should have configured the service to be started automatically on the next system boot.
From the NXLog documentation, it is also possible to start the service directly from the services console, or from the command line interface by navigating to the install directory and running nxlog.exe -f. This last option may assist in initial debugging.